
Noteflight Learn allows teachers to easily create assignments for students to complete, and Noteflight has several features for formatting worksheets, giving instructions, and providing feedback. Here are a few tips and tricks for getting the most out of your digital student worksheets:
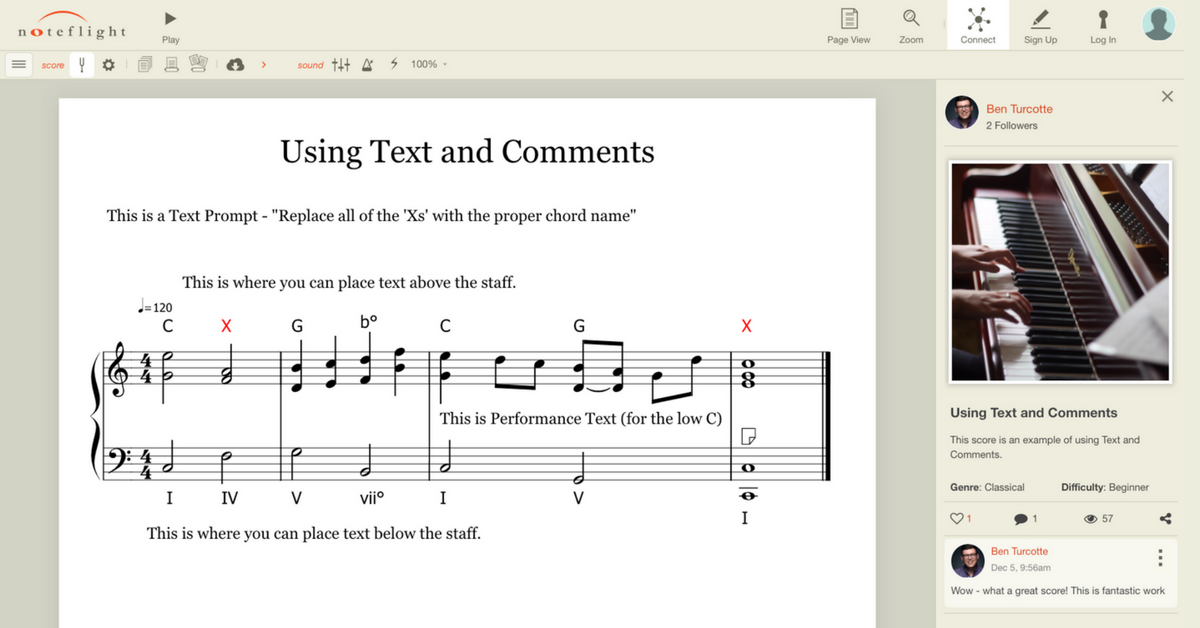
Using Text and Comments
1. Start With a Text Prompt. The Text Prompt feature is the best way to provide instructions for the entire document. By pressing the “Enter” key, you can create line breaks that will format the instructions in sequential steps.2. Text Above or Below the Staff. In addition to Text Prompts, Noteflight offers options for placing text boxes above or text boxes below the staff. These are ideal for adding additional instructions for each musical staff, and also provide a place for students to write comments or answers to questions.
3. Chord Symbols and Figured Bass. Chord Symbols should be used to identify chords, and this feature also recognizes and formats figured bass. Use a ‘/’ to make the numbers stack, such as V6/4: ![]()
4. Annotate It. The Annotation Tool provides a textbox for typing instructions or special information without cluttering the page with text. A small “paper note” icon will appear by the note to indicate that an annotation has been made.
5. T for Text. For specific note needs, using the Performance Text option on a selected note will allow you to type text that is attached to this note, and works well for fingerings or special instructions.
6. Comments in Score Details. For feedback, the comment feature in Score Details is best and can also be used for peer review, which gives you a record of who commented.
Check out this example score showing all of the text options:
POWER TIP:
When you want your students to add text to a worksheet, create a premade placeholder that is the type of text option you’d like them to add. From here, students can simply click the placeholder text and type. They do not have to remember when to use a chord symbol, text, or a prompt. A simple “type your answer here” or putting an “X” as a chord symbol works well, and you can provide instructions such as “Replace all ‘Xs’ with the proper chord.”
Systems and Measures
1. Lock Those Systems. Use the Create System option to format a selected set of measures into one system. This way, these will always stay locked together even if students change the size for other screens.2. Final Bar Lines. Be sure to use a final bar line at the end of each system so it is easy for students to see where each exercise ends.
3. Hide Cautionary Key Signatures. When the next exercise is in a different key, use the Hide/Show Cautionaries option in the Measure Palette to remove the courtesy key and make each system look independant.
4. Restart Measure Numbers. If your worksheet includes a collection of examples, you can edit the measure numbers by selecting the first number of the new line and changing it. This way you can have each exercise in a worksheet start on measure “1”, or if using an excerpt you can properly identify the starting measure.
5. Spacing It Out. Sometimes you want some extra space between systems that have new exercises. One trick is to use some small text to push the system spacing apart. Add a “.”, select it, then use the up arrow keys to move the text and space out the measures. You can even use the color palette to make this text invisible.
Check out our demo score with the System and Measure Options:
POWER TIP:
The Score Settings Menu provides many tools for resizing text, notes, and systems. This is useful to format worksheets to all fit on one page, or even make the score size larger for younger students or for projecting to the class.
Coloring is Fun
1. Call Out With Colors. Color a note or range of notes to help identify them in your instructions. For example: “Please add chord labels to the blue notes in each chord”.2. Comment with Colors. Color a note or range of notes to help identify them in a comment or feedback. For Example: “The red notes are incorrect.”
3. Color Coding. Colors can also be used for analysis, such as coloring the melody in green and counter melody in blue.
4. Classroom Colors. The Noteflight color palette expands to include Classroom Colors, which are common in general music. This is a great resource for having students identify specific pitches by color.
Check out our demo score with color examples:
POWER TIP:
The color palette includes an “invisible” color, which is handy for hiding objects in a measure or on the page.
Listening is Important
1. Independent Playback Setting. The audio mixer allows you to independently select the playback options separately from parts in a score, so you can choose what parts to display and what you want to hear.2. Live Audio Recording. Recording is a great way to allow students to hear a model performance of a part, or even record the part themselves for performance assessments. You can even make a recording to empty staves and have students transcribe what they hear!
3. Media Sync It. In addition to recording, Noteflight allows you sync a score playback with a YouTube or Soundcloud file. You can even record to a score that is synced, allowing for the creation of worksheets where students have to perform a combination of of tasks. You could provide a choral example and have students analyze it, sync it to a YouTube performance (and match up the key if different), then record themselves singing a part!
Check out our latest contest winner’s score synced to a live performance:
POWER TIP:
Recording and Audio Sync can be used to create many aural skills exercises. Check out these great examples from our friend Dr. Jena Root!
Have any more great ideas or tips for worksheets? Email us at info@noteflight.com with your own suggestions!